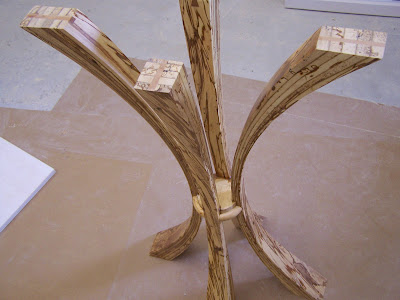
I get to do some pretty cool stuff sometimes.
Starting from very rough cut, thick and twisted, beginning the first stage of rot, with burrows of bugs and yes, I cut through a big bug, chunks of wood, here's this slick table designed by Harley Ashbaugh.
It's made from
spalted Red Gum and is about four and a half feet long and and twenty inches wide.
The most difficult part of this project was making the hub that connects the legs. Because the wood was so soft, I laminated a piece of Maple in the center to accept dowels or screws. It is covered by the segments of radiused molding. Making the 2 inch thick disk was easy but how do you make compound angled dados in the edge of a disk?
The hub is located off center of the legs, which both taper and splay. Even the radius molding had to be tapered to match the legs.
I started out with a jig that produced a straight and square dado just big enough to fit the smallest part of the leg.
See that white-ish piece of 1/2" plywood between the fence and the brown fiberboard jig? That lets me create a cut a half inch bigger than the dado blades without moving the fence. Make a cut, insert the spacer and make the rest of the cut. I used this same trick to to taper the sides of the dado, except this time, I used a small strip as a spacer. I placed the strip at the back of the jig to taper one side and at the front of the jig to taper the other side. (Prior to this, I added a spacer to the bottom of the jig at the back and raised the blades accordingly to create the inside taper) Each dado was completely formed before rotating the hub for the next one by using this technique with spacers.

The legs were pretty easy to form. That is,easy after making the jigs. They are a bent-lamination of radiused strips. The 3-1/4" wide strips were formed by placing them in a jig which has a curved bottom. When the jig is fed through the planer, the pinch rollers hold the strip and all down, forcing it to curve to the radius of the jig. The ones I made produce strips about four feet long with a 5/8" end thickness and 1/8" center thickness. If you try this, don't forget that the rollers want to pull the strip off the jig and the knives want to throw it at you. Put sides and a front and back on the jig and raise the bed no more than an eighth inch at a time. After the "lams" were milled, they were glued together and clamped to a bending form, then the sides were cut to shape with the band saw.
The little dovetails at the top and bottom of the legs are made of Cherry and serve to reinforce the lamination. Simple to do but heartbreaking if you mess up.

I put a brand new 1/2" dovetail bit in my favorite router and made a tray out of 1/4" plywood and some 3/4 x 3/4 strips. The base of the router fits snugly between the sides of the tray, only allowing the router to move in a straight line. The front and back of the tray limit the length of the cut. Because the legs are not square in section (they taper toward the center of the table) and there are two sizes, I opted not to make this a self-indexing jig. I just marked where I wanted the dovetail and screwed the jig to the bottom.
The legs and top are attached with dowels
Spalt it yourself!


